WHEP Gateway v1.10.10
Stream live video to any web browser via WebRTC/WHEP. 30-day Pro trial unlocks NDI, SRT and WHIP ingest, NDI/OMT output and RTMP/SRT restream. Upgrade to Ultra for DeckLink, AJA capture and DVR recording.
Debian 13 (Trixie) live appliance · kernel 6.19 · v1.10.10 · license required
Same ISO for both tiers — your license key determines PRO or Ultra.
v1.10 simplifies pricing: 30-day trial now grants the full Pro feature set, then Pro (£45/mo or £900 lifetime) or Ultra (£75/mo or £1,500 lifetime) to keep the gateway running.
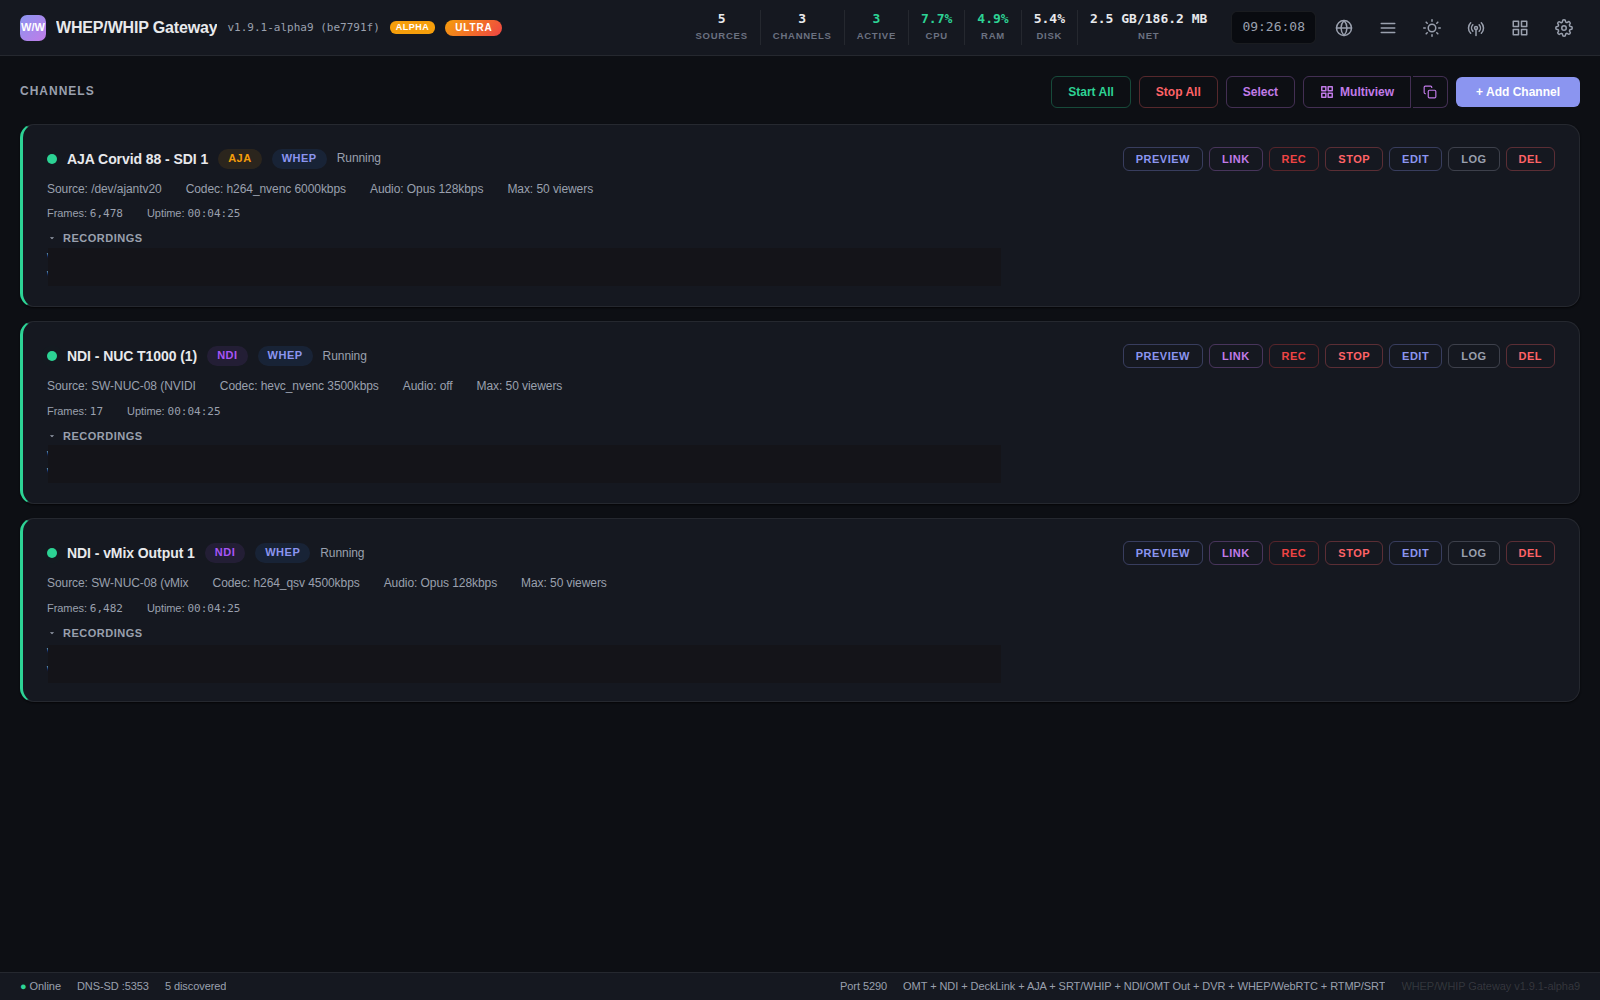
Dashboard on a customer's Intel Ultra 9 285 + RTX 2000E + AJA Corvid 88 workstation — AJA SDI on NVENC, two NDI channels on NVENC and Intel QSV, Ultra tier, full stack in the footer
Setup Guide
Up and running in nine steps — flash the ISO, open the dashboard, configure HTTPS, add a channel and share the watch link.
1 Install the Appliance
The gateway ships as a bootable Linux ISO. Flash it to a USB drive and boot on any x86_64 PC, NUC, or server.
Flash the ISO
- Download the ISO (1.6 GB)
- Flash to a USB drive using Rufus (Windows) or balenaEtcher (Windows/Mac/Linux)
- Boot your target machine from USB
BIOS / boot settings
The appliance bootloader is unsigned, so most machines need a couple of firmware tweaks before they will boot it — especially business/OEM hardware (HP, Dell, Lenovo):
- Disable Secure Boot — required. The live ISO and the installed bootloader are unsigned, so Secure Boot blocks them with “Access Denied” / “Security Violation”. It is under Security or Boot in BIOS — set it to Disabled.
- Enable USB boot — make sure USB is allowed in the boot order (some firmware has a separate “USB boot” toggle).
- Disable Fast Boot / Quick Boot — it can skip USB enumeration so the drive is never detected.
- Boot mode UEFI — UEFI is preferred; Legacy/CSM also works on older machines. Do not switch modes after installing.
- Boot order — put USB first to run the installer, then move the internal disk to the top after
install-to-disk. - NVIDIA dGPU / HP workstations — if it hangs at boot, pick the Safe Graphics entry in the GRUB menu (v1.10.2+ bakes in the nouveau/ACPI quirks).
If a disk-installed machine later will not boot and shows “Access Denied”, that is Secure Boot again — it sometimes re-enables after a firmware update. Disable it in BIOS.
Live Boot & Setup
The ISO boots into a live environment. A setup wizard runs on the console to configure hostname, admin password, GPU encoding, TLS mode.
Install to Disk
To install permanently, run install-to-disk from the console (or use the setup wizard). This copies the live system to a local disk so settings persist across reboots.
First-Boot Services
After setup, the appliance will:
- Auto-detect your GPU (Intel VAAPI, NVIDIA NVENC, AMD AMF)
- Generate a self-signed TLS certificate
- Start the gateway service and display the dashboard URL on the console
2 Open the Dashboard
Open a web browser on any device on the same network and go to:
The IP address is shown on the appliance console after boot
http://<appliance-ip>/api/ca.crt).
3 Configure HTTPS
Open Settings → TLS / HTTPS in the dashboard. Choose one of these modes:
The Settings tabs
One left-nav, every operator surface — in the same order as on the appliance. Settings reload live unless the panel says otherwise.
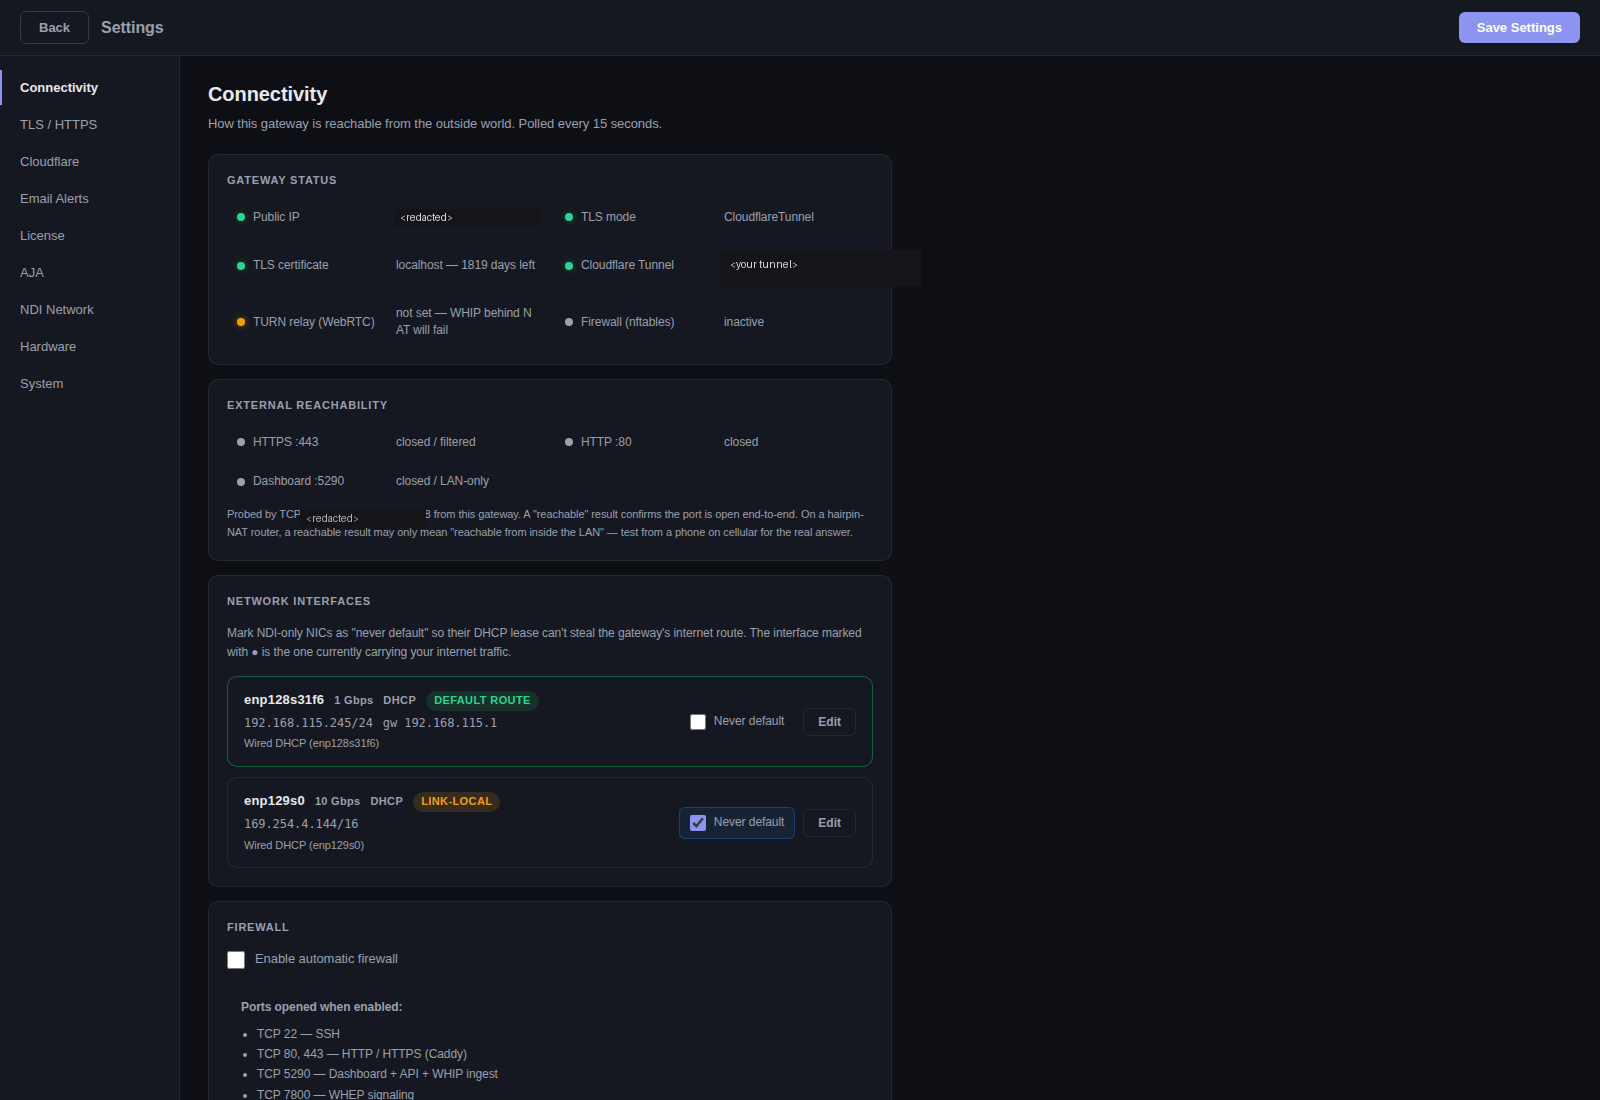
Connectivity — gateway status, external reachability probe, multi-NIC management (mark NDI-only NICs as “never default” so DHCP can’t steal the internet route), and a one-click firewall.
4 Add a Channel
Click + Add Channel on the dashboard. Choose a source type:
- Discovered — OMT sources auto-discovered on your network
- SRT Ingest — receive an SRT stream on a specified port
- WHIP Ingest — receive a WHIP push from a browser or encoder
- NDI PRO — receive NDI streams from the network
- DeckLink ULTRA — capture from Blackmagic SDI/HDMI cards
- AJA ULTRA — capture from AJA Kona, Corvid, and IO 4K cards via V4L2
Channel Settings
Codec Recommendations
5 Start & Watch
Click the Start button on your channel. The gateway begins encoding and you can:
- Preview — Click PREVIEW on the channel card to watch in the dashboard
- Watch Link — Click LINK to copy the watch URL. Opens a full-screen player.
- Multiview — Click the grid icon in the header to open a multi-channel monitoring wall

Preview — live video playing directly in the dashboard with LIVE badge, codec stats, mute/fullscreen controls
Watch URL Format
Share this link with viewers — no login required (unless viewer password is set)
6 Outputs & Restreaming
Each channel can push to multiple output destinations simultaneously:
7 Remote Access (Cloudflare Tunnel)
To share streams with viewers outside your local network without opening firewall ports:
- Go to Settings → Cloudflare
- Click Enable Cloudflare Tunnel and save
- A public URL (
*.trycloudflare.com) is generated automatically — no account required - Share the tunnel URL with remote viewers
Persistent Tunnel (Optional)
For a permanent URL with your own domain:
- Create a tunnel in the Cloudflare Zero Trust dashboard
- Point the tunnel to
http://localhost:5290 - Paste the tunnel token in Settings → Cloudflare → Tunnel Token
Cloudflare TURN Relay (Optional)
For improved WebRTC connectivity behind strict firewalls:
- In the Cloudflare dashboard, go to Calls → TURN Keys
- Create a key and copy the Key ID and API Token
- Paste into Settings → Cloudflare → TURN Relay
8 Email Alerts (Optional)
Get notified when channels fail or OMT sources disappear. Go to Settings → Email Alerts:
- Enter your SMTP server details (host, port, username, password)
- Set a sender address and recipient list
- Enable Channel failure and/or Source loss triggers
- Click Send Test Email to verify
9 Pricing & License
A license key is required to use the gateway. Contact us to request a trial.
- Enter a PRO or Ultra license key in Settings → License → Activate
- PRO: £45/mo or £900 lifetime — Ultra: £75/mo or £1,500 lifetime — 30-day Pro trial included
Same ISO for both tiers — your license key determines PRO or Ultra. Start with a free 30-day Pro trial. Contact us if you need an extended trial.
Already purchased? Retrieve your license key.
Bought a Standard license before v1.10? It keeps working forever — contact us about upgrade pricing to PRO.
Features
What the gateway does, shown with screenshots from a live deployment — ingest, multiview, channel encoding, outputs, DVR and live hardware telemetry.
PRO vs Ultra
Both tiers ship on the same ISO. PRO covers full broadcast ingest and output. Ultra adds capture cards, DVR recording, multi-channel NDI audio and Instant Replay, with ST 2110 and Broadcaster coming soon. A 30-day trial unlocks every PRO feature so you can decide which tier fits.
PRO
- OMT, NDI, SRT & WHIP ingest — full broadcast input
- WHEP/WebRTC delivery — browser playback, shareable links
- WHIP push output — push to WHIP-compatible endpoints
- NDI & OMT network output — send to the network
- RTMP & SRT restream — push to YouTube, Twitch, etc.
- H.264, HEVC, AV1 — software + GPU hardware encoding
- Up to 16 channels (2,000 viewers each)
- Cloudflare Tunnel & TLS
- Web dashboard — multiview, stats, email alerts
ULTRA + PRO
- DeckLink capture — Blackmagic SDI/HDMI input
- AJA capture — AJA Kona/Corvid via V4L2
- DVR recording — record channels to disk with configurable retention and storage quota
- Multi-channel NDI audio — discrete audio pairs from NDI & OMT sources
- Instant Replay — instant slow-motion replay from the live buffer
- ST 2110 (Coming Soon) — SMPTE 2110 IP video
- Broadcaster (Coming Soon)
- 32 channels (2,000 viewers each)
Ultra is a superset of PRO — all PRO features are included in Ultra.
What It Does
The WHEP Gateway bridges video sources to standard WebRTC/WHEP, so anyone with a web browser can watch live streams — no plugins, no apps, no downloads.
Ingest OMT, SRT, WHIP and NDI (plus DeckLink/AJA capture on Ultra), transcode in H.264, HEVC, AV1 or VP9 (software or GPU), and send it out as WHEP browser playback, WHIP push, NDI/OMT network output, or RTMP/SRT restream to YouTube, Twitch or any endpoint. ULTRA adds DeckLink/AJA capture, DVR recording, multi-channel NDI audio and Instant Replay, with ST 2110 and Broadcaster coming soon — the full breakdown is in the comparison table above.
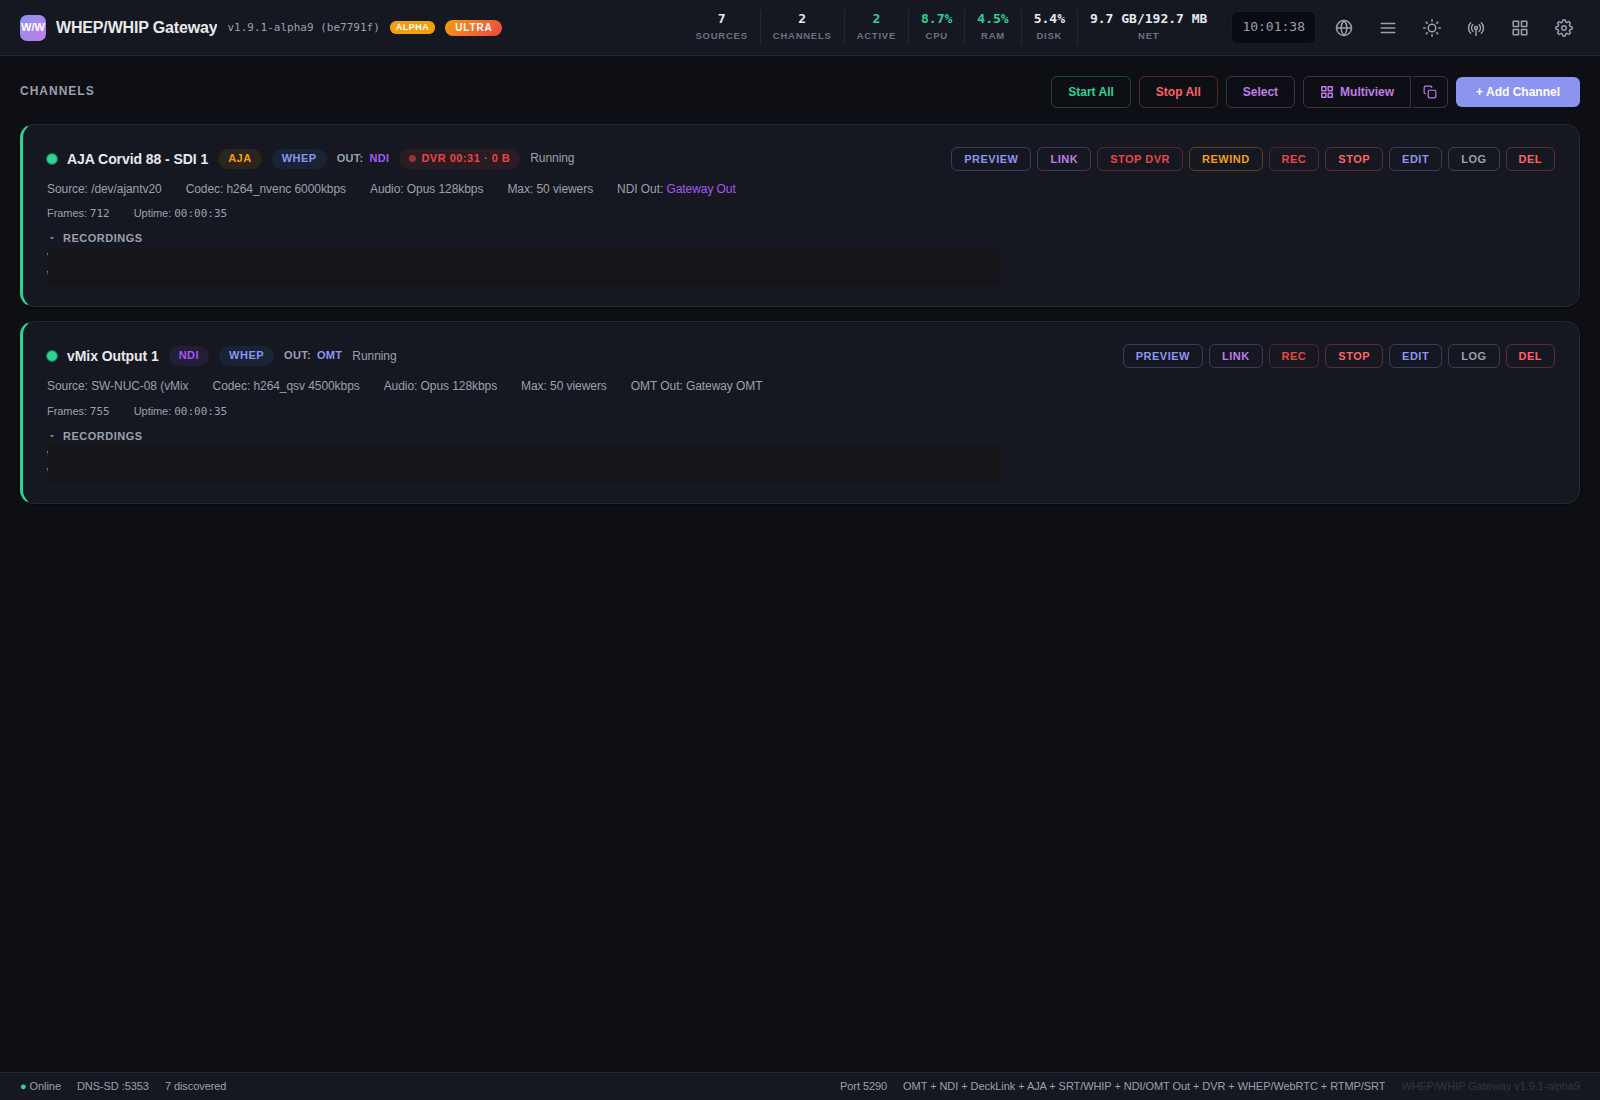
Channel cards with the outputs and recording wired up — AJA capture with NDI output and a live DVR window, NDI source with OMT output. Every action (preview, watch link, REC, STOP DVR, REWIND, EDIT, LOG, DEL) is one click from here.
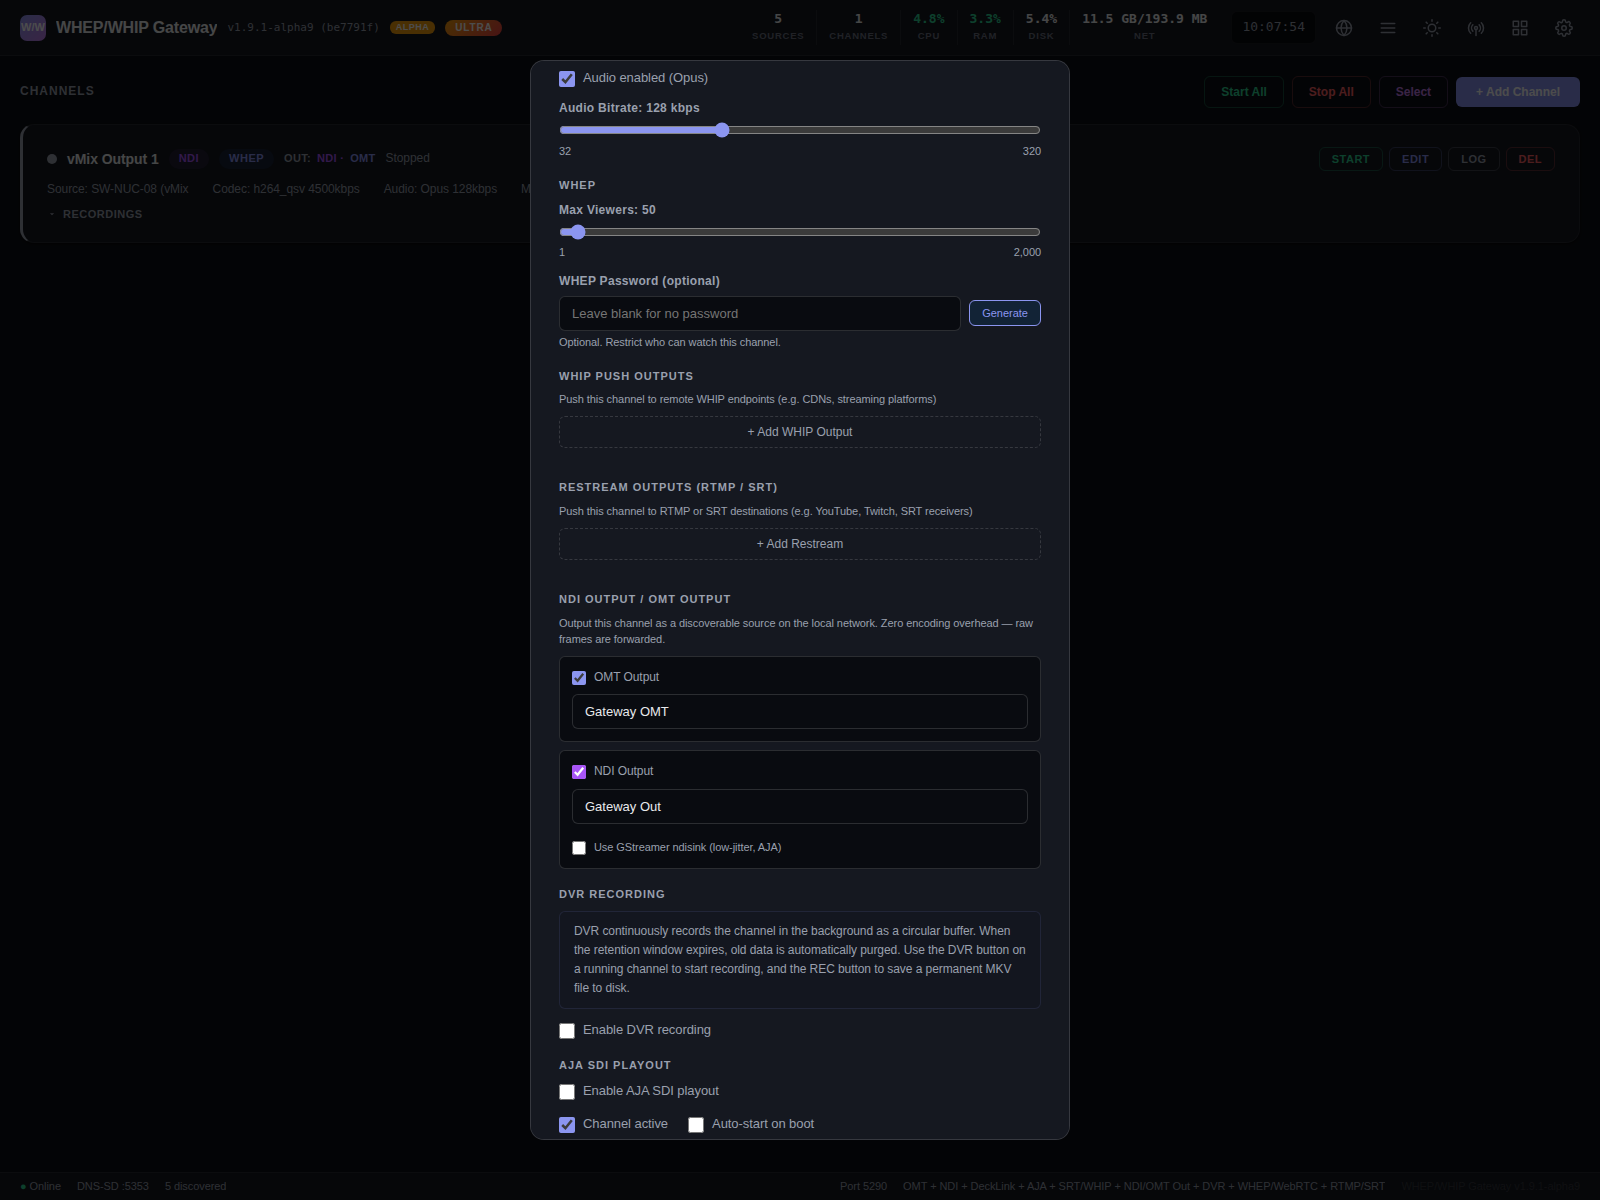
Scrolling further in the same dialog — NDI Output and OMT Output are simple checkbox + name fields (zero encoding overhead, raw frames forwarded). Same panel also holds WHIP push, RTMP/SRT restream, DVR recording ULTRA and AJA SDI playout ULTRA.
DVR Recording & Playback ULTRA
Enable DVR on any channel to record a rolling buffer of video and audio to disk. Viewers can rewind the live stream directly from the watch page — no separate VOD system needed.
- Instant rewind: drag the timeline to scrub back through recorded footage with ~50ms seek latency
- Variable speed: play back at 1x, 2x, or 4x speed — audio is muted at fast speeds
- Seamless live return: click the LIVE button to switch back to real-time WebRTC with sub-second latency
- Configurable retention: set how many minutes of video to keep per channel (default 30 min)
- One-click recording: hit the REC button on the dashboard to save an MKV file to local storage
Use Cases
Remote Monitoring
Give directors, producers, or clients a browser link to watch camera feeds from anywhere. No software to install — just open the link on a phone, tablet, or laptop. Combine with Cloudflare Tunnel for secure access over the internet.
Multi-Site Event Production
Stream venue feeds to a remote production hub or overflow rooms. Sub-200ms latency means talkback and live switching stay in sync. Run multiple channels on a single gateway.
House of Worship & Corporate AV
Let congregation members or remote staff watch services and meetings live in a browser. No CDN fees, no third-party streaming platforms — just a direct WebRTC link from your infrastructure to the viewer.
Broadcast Confidence Monitoring
Replace expensive hardware monitors with browser tabs. Open a multiview grid of all your sources on any screen in the building — green rooms, control rooms, producer desks.
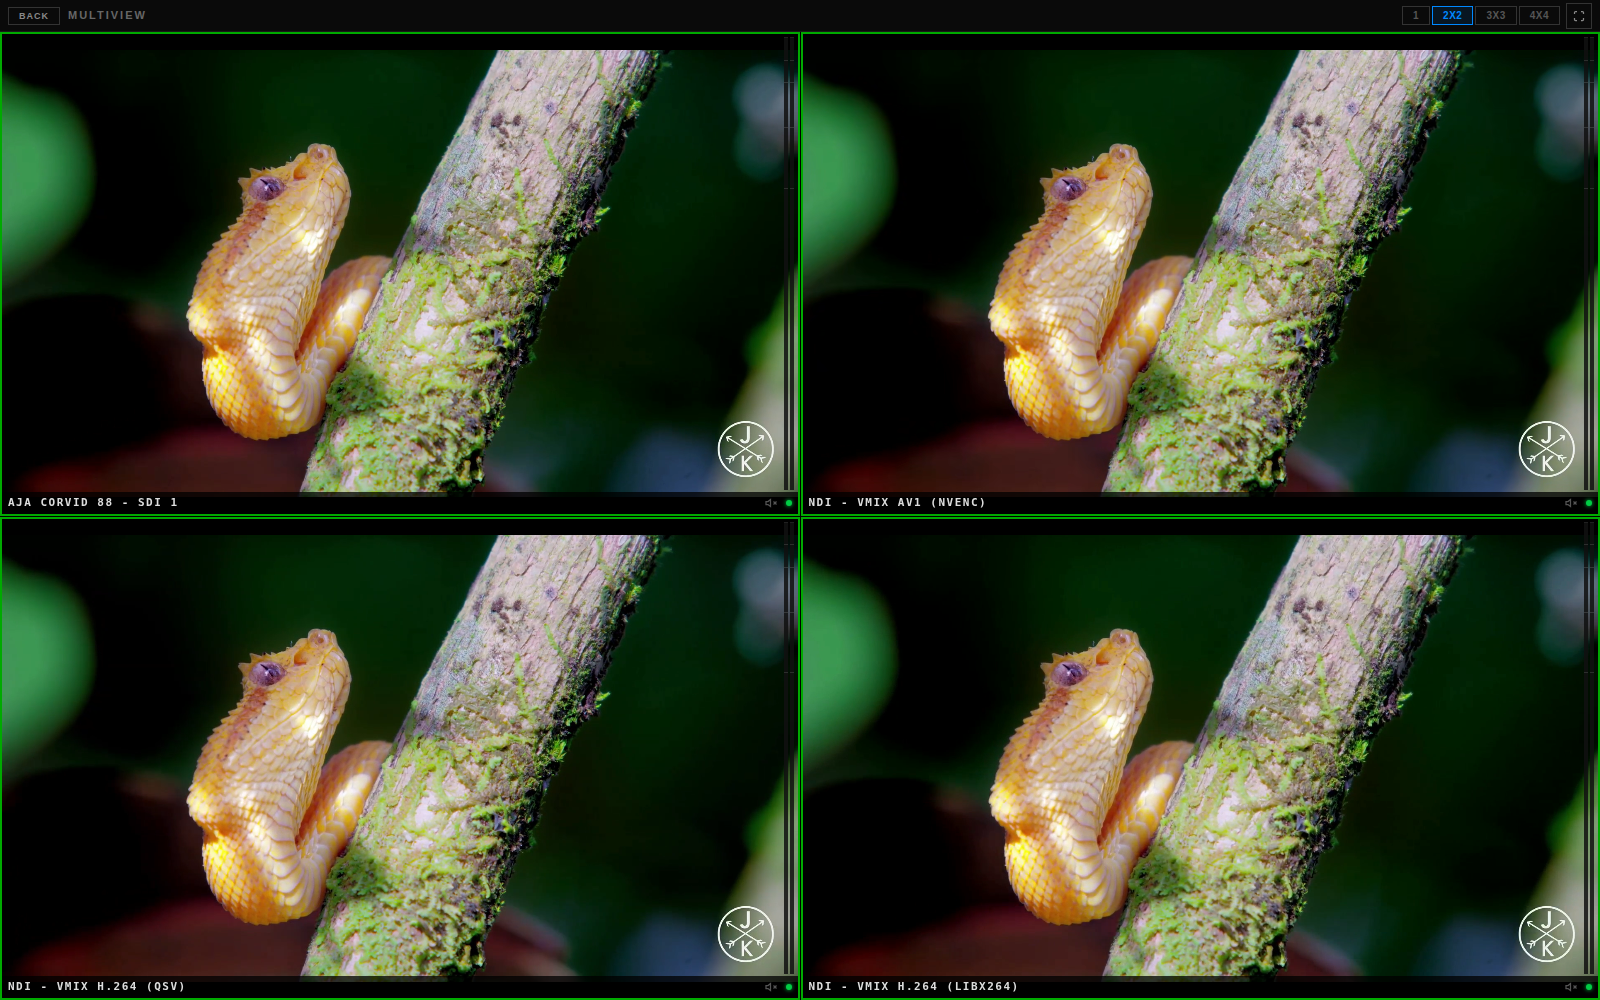
Multiview — 2x2 monitoring wall on Kevin's box with four live tiles: AJA SDI on H.264 NVENC, NDI via AV1 NVENC, NDI via Intel QSV, NDI via libx264. 1, 3x3 and 4x4 layouts also available.
Live hardware telemetry
The Hardware tab gives you live thermals, CPU, GPU encoder utilisation, fan, power, clocks, NIC throughput and NVMe stats — with five-minute sparklines on every reading. Useful for confirming the right hardware path is in use and for catching thermal trouble before it bites.

Hardware telemetry — Intel Core Ultra 9 285 (24 threads), NVIDIA RTX 2000E Ada Generation with live encoder utilisation (NVENC busy), Intel Arrow Lake-S iGPU detected for QSV/VAAPI
API Reference
The gateway exposes a full REST API at https://<host>/api/ for programmatic control of channels, sources, outputs, recording and system — 90+ endpoints. A live, self-documenting index is available at /api on your running gateway, with the complete reference in docs/API.md.
Network & Ports
Remote access: Use Cloudflare Tunnel (no open ports) or forward UDP 10000–10100 + TCP 443.
SSH Access
The appliance has SSH enabled for administration:
Default password: omtwhep — change this after first login
Useful commands:
show-ip— Display dashboard URL, API endpoint, versionsudo systemctl status whep-gateway— Check service statussudo systemctl restart whep-gateway— Restart the gatewaysudo journalctl -u whep-gateway -f— Follow live logs
Troubleshooting
- No sources found? Ensure the OMT encoder is on the same network/subnet. Check that UDP 5353 (mDNS) is not blocked.
- Channel starts but video is black? Check the FFmpeg log (click LOG on the channel card). Common causes: wrong source selected, source not actively sending.
- High CPU usage? Switch to hardware encoding (VAAPI, QSV, NVENC) if you have a supported GPU.
- Viewers see "ICE gathering timeout"? The player automatically falls back to WebSocket relay after 4 seconds. If using Cloudflare Tunnel, this is expected.
- Certificate warning in browser? Install the CA certificate:
http://<ip>/api/ca.crt. Or switch to Let's Encrypt in TLS settings. - Audio not working? Check that audio is enabled in the channel settings. The player starts muted by default — click the unmute button.
- "License required" — channels stopped? Enter a valid license key in Settings → License. Contact us if you need help.
- NDI not showing? NDI ingest requires a PRO or Ultra license. Check Settings → License for your current tier.
- DeckLink/AJA not showing? Capture card support requires an Ultra license. Install drivers in Settings → DeckLink or Settings → AJA.
System Requirements
ULTRA DVR recording buffers frames in memory per active channel. We recommend 16 GB RAM and 120 GB+ NVMe storage minimum when using DVR, especially with multiple channels or high-bitrate sources (4K/HEVC). Disk space for DVR is configurable via retention time and storage quota (default: 60 min / 10 GB).
Hardware Encoding Support
Need Help?
Contact us at contact@sebiulabs.co.uk
Website: sebiulabs.co.uk